TL;DR:
- Proper makeup layering involves applying thin, structured layers in the correct order from primer to powder to ensure long-lasting, natural coverage. Waiting 30 to 60 seconds between layers helps products bond and extend wear time, while pressing powder with a damp sponge improves durability. Different techniques like classic layering or underpainting offer varied finishes based on individual preferences and skin types.
The makeup layering technique is defined as applying cosmetics in thin, structured layers from liquid to cream to powder, in a specific sequence, to build a flawless and long-lasting finish. This method is also called makeup stacking in some beauty communities, though “layering” is the standard industry term used by professional makeup artists. The core principle is simple: each product type bonds best to a compatible texture beneath it. Correct layering order prevents patchiness and uneven texture, and 94% of people report 10+ hours of wear when they follow the right sequence. That single statistic tells you everything about why this technique matters.
- Check our Clean Beauty page where we feature skincare and makeup products whose AI ingredient safety analysis scored 80/100 or higher — cleaner formulations, fewer concerns.
What is the ideal order for layering makeup products?
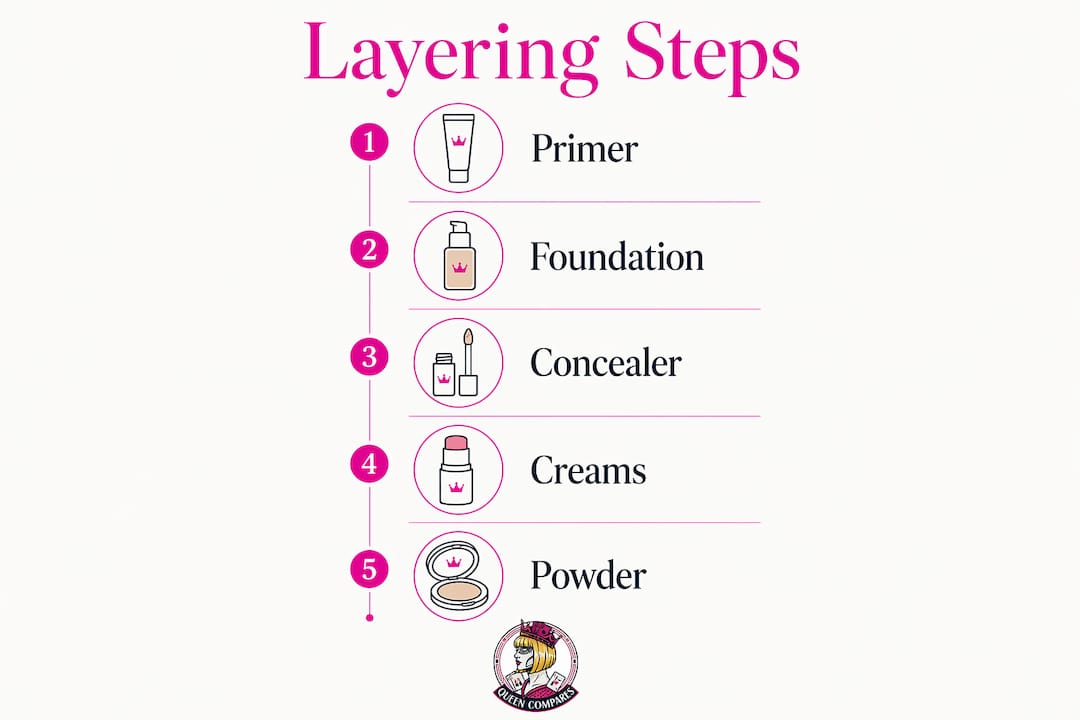
The standard layering order is primer, foundation, concealer, cream products, and then powder. This sequence follows the liquid to cream to powder rule, and breaking it causes real problems. Applying a liquid product over a powder base creates a patchy, uneven finish because the textures repel each other rather than bonding. Think of it like trying to paint a wet wall over dry plaster that has not been primed.
Timing between layers matters just as much as order. Waiting 30–60 seconds between each layer allows products to bond and set properly. Rushing this step reduces wear time by 2–3 hours. That is a significant loss for a full day of wear, and it is one of the most common mistakes beginners make.
Here is the recommended sequence for a full face:
-
Primer: Applied first to smooth skin texture and create a base for adhesion
Recommended:
-
Foundation: Liquid or cream formula applied in thin passes, not one heavy coat
Recommended:
-
Clarins Double Serum Foundation - (best overall)
-
RMS Beauty Un Cover-up Cream Foundation (best clean beauty choice)
-
-
Concealer: Placed after foundation so you only cover what the foundation did not
Recommended:
-
Cream blush, bronzer, or contour: Applied while the skin is still slightly tacky for better grip
-
Setting powder: Pressed, not swept, to lock everything in place
-
Setting spray: Optional final step to meld all layers together
Pro Tip: Set a 45-second timer on your phone between your primer and foundation. It feels unnecessary until the first time you skip it and watch your makeup slide by noon.
Understanding your skincare routine order also helps here. Products applied to bare skin before makeup, like serums and moisturizers, affect how well your first makeup layer adheres.
How does makeup layering improve longevity and reduce product use?
Proper layering extends wear time and cuts down on how much product you actually need. Layering reduces product usage by up to 50% because you apply coverage only where it is needed rather than coating your entire face. That targeted approach also keeps the finish looking natural rather than heavy.
The press and roll powder technique is one of the most effective tools for durability. Pressing a damp sponge into set powder and rolling it gently across the skin locks in the layer beneath without disturbing it. 88% of people report an 8+ hour blurring effect using this method. The motion matters because sweeping disrupts the layers you have already built.
| Layering approach | Wear time | Product used | Finish |
|---|---|---|---|
| Correct sequence with timing | 10+ hours | Reduced by up to 50% | Natural, skin-like |
| Rushed layering, no wait time | 7–8 hours | Standard amount | Slightly uneven |
| Incorrect order (powder before cream) | Under 6 hours | Often more to fix patches | Patchy, heavy |
Common pitfalls that cause product buildup include applying too much foundation in one pass, skipping the wait time between layers, and using a sweeping motion with powder. Each of these disrupts the bonding process. The result is a cakey finish that looks worse as the day goes on.
Pro Tip: Apply foundation in two thin passes rather than one thick one. The second pass covers what the first missed, and the total product used is still less than a single heavy application.
Skin chemistry also plays a role. Makeup longevity depends on how well cosmetic polymers bond to your skin’s surface. Rushing the setting time breaks that bond before it forms.
What are the main layering methods and how do they differ?
Two main layering methods exist in professional makeup artistry. The first is classic layering, where you apply foundation first and then build color products like blush and contour on top. The second is underpainting, a technique associated with makeup artist Patrick Ta, where contour and blush go before foundation. Both methods work, but they produce different finishes.
Underpainting creates a softer, more diffused color effect because the foundation sheers out the pigment beneath it. Classic layering gives you more control over color placement and intensity. The choice depends on the finish you want, not on a rigid rule about which is “correct.”
Micro-layering is a third approach worth knowing. Micro-layering applies ultra-thin films that flex with the skin rather than sitting on top of it. This technique is standard practice for high-stress or long-wear situations because heavy layers fracture and crack as the face moves. Micro-layering also allows the skin to breathe, which improves comfort over long wear periods.
Concealer placement is another area where order can vary. Placing concealer before foundation works well for heavy blemish coverage. Placing it after foundation means you use less product because the foundation has already done some of the work. True layering is modular, meaning the order adapts to the desired payoff and product finish rather than following a single rigid sequence.
Your personalized skincare approach also shapes which layering method works best for you. Oily skin types benefit from lighter cream layers and more powder. Dry skin types do better with fewer powder steps and more cream-based products.
Which tools and techniques give you the best layering results?
The right tools make or break a layering technique. Professionals use damp sponges and high-density synthetic brushes to press product into the skin’s texture rather than dragging it across the surface. This pressing motion prevents the layers beneath from shifting and keeps the finish intact.
Key tool and motion guidelines:
-
Damp beauty sponge: Best for foundation and concealer application. The damp texture sheers out product and prevents over-application.
-
High-density flat brush: Ideal for pressing powder into skin without disturbing cream layers beneath.
-
Pressing and tapping motion: Use this for all powder steps. Sweeping disrupts layers and causes patchiness.
-
Fan brush: Works for light powder dusting over a finished look but not for setting individual layers.
-
Setting spray between layers: Spritz a fine mist over cream products before adding powder. Setting spray melds products without disturbing the base, which is especially useful when you need to apply cream blush over a powdered base.
The setting spray trick is particularly useful for beginners who accidentally powder too early. A light mist reactivates the surface just enough to accept the next cream product without creating a patchy mess. It is not a fix for skipping the correct order entirely, but it does give you some flexibility.
Avoid using fingers for powder steps. Fingers apply uneven pressure and transfer oils that break down the layer beneath. Reserve finger application for cream products only, where the warmth of your skin helps blend the product naturally.
Key Takeaways
The makeup layering technique builds a flawless, long-lasting finish by applying products in a liquid to cream to powder sequence, with intentional timing and the right tools between each step.
| Point | Details |
|---|---|
| Follow the correct sequence | Apply primer, then foundation, concealer, cream products, and powder in that order. |
| Wait between layers | Allow 30–60 seconds between each layer to prevent reduced wear time. |
| Use pressing motions | Press and roll powder with a damp sponge instead of sweeping to lock in coverage. |
| Adapt your method | Choose classic layering or underpainting based on the finish you want, not rigid rules. |
| Target coverage only where needed | Layering reduces product use by up to 50% when applied only where coverage is required. |
What I have learned from years of layering makeup wrong
By Magdalena Kapuscinska
The biggest mistake I see is treating layering like a checklist rather than a conversation with your skin. People follow the steps in the right order but rush through them, and then wonder why their makeup looks fine at 9 a.m. and falls apart by noon. The 30–60 second wait between layers is not a suggestion. It is the difference between a look that lasts and one that slides.
The second thing I have noticed is that most people use too much product in the first layer because they are trying to get full coverage in one pass. Intentional, gradual layering targeted only where you need it produces a more natural finish than heavy coverage applied everywhere. The skin still shows through slightly, and that is what makes it look real.
Skin chemistry is the variable nobody talks about enough. Two people can follow the exact same steps with the exact same products and get completely different results. Understanding your skin’s pH balance and how it interacts with cosmetic formulas changes everything about how you approach layering. What works for dry skin in winter will not work for oily skin in summer.
My honest advice: slow down, use less, and press more. Those three adjustments will improve your results more than any new product purchase.
— Magdalena Kapuscinska
QueenCompares makes smarter product choices possible
Choosing the right products for layering is half the battle. A primer that does not play well with your foundation will undermine every technique in this guide, no matter how perfectly you time your layers.

QueenCompares gives you side-by-side product comparisons so you can see exactly how two foundations or primers stack up before you buy. The Ingredient Checker lets you test whether the products in your current routine are compatible with each other, which is the first step toward building a layering stack that actually works. You can also browse the Ingredient Library to understand what each formula contains and how it behaves under other products. Our community of beauty enthusiasts shares real reviews that reflect real layering results. Come find your next favorite layering combo with us.
FAQ
What is the makeup layering technique?
The makeup layering technique is the practice of applying cosmetics in thin, sequential layers from liquid to cream to powder to build coverage, longevity, and a natural finish.
What order should I apply makeup when layering?
The standard order is primer, foundation, concealer, cream color products like blush and contour, and then setting powder. Powder always comes last among these steps.
How long should I wait between makeup layers?
Waiting 30–60 seconds between each layer allows products to bond properly. Skipping this step reduces wear time by 2–3 hours.
What is the difference between classic layering and underpainting?
Classic layering applies foundation before color products. Underpainting, associated with Patrick Ta, places contour and blush beneath foundation for a softer, more diffused effect.
Does makeup layering really reduce how much product I use?
Layering reduces overall product use by up to 50% because you apply coverage only where it is needed rather than coating the entire face uniformly.